29.8.18

Snow Kissed Frosty Card

New on the Heartfelt Blog today. An oldie but a goodie, one of my favourites, the Frolicking Frosty from the Snow Kissed Collection. This is a great quick card if you have to make just one or if your need to make a lot for this years Christmas Cards. Hope you enjoy my little creation.

Heartfelt Creations Products 

HCD17101 Frolicking Frosty and Spruce Die
HCPC3750 Frolicking Frosty Cling Stamp Set
HCPC3749 Snow Kissed Spruce Cling Stamp Set
159723 Designer Dries Clear Adhesive
159951 Designer Dries White Adhesive
Ranger Archival Jet Black Ink
HCPC3748 Gift Wrapped Present Stamp Set


Other Products

White Cardstock, Red Cardstock, Ultrafine glitter, 
3d Adhesive.

Instructions


Cut your white cardstock 10" x 6" for your base card, fold in half and use a bone folder for a clean line. Cut your white cardstock 4 1/2" x 5 1/2" and one more white mat 3 1/4" x 1 1/4". Cut your red cardstock 4 3/4" x 5 3/4" and 3 1/2" x 1 1/2". Adhere your large white mat to its matching red mat. 
Stamp your sentiment onto your small white mat, adhere to its matching red mat. Stamp your trees using your Snow Kissed Spruce Stamp using your black archival ink on white cardstock, stamp each size tree once and cut out with coordinating dies. Using your snowman stamp with the tree scene, stamp your base white card stock first and then stamp a second snowman on red cardstock, die cut the red snowman with the coordinating die then fussy cut out the beanie, mittens and the skates. Assemble your card, adhere your largest tree flat onto your scene at the back first. Using 3d adhesive adhere your 2 other trees. Adhere your fussy cut red pieces flat over the stamped snowman. Highlight the trees with Designer dries white glue and apply ultrafine glitter over the top to create snow. Repeat this step at the bottom of the snowman to create a snow scene. Decorate with stickles as desired. When dry adhere your sentiment in place using 3d adhesive.

Using the same products, just use the other snowman stamp and change the red cardstock for blue cardstock you can create this alternate card.


Happy Crafting 
Tracy C x x 


22.8.18

Sparkling Poinsettia Christmas Wreath - Step by Step Tutorial


New step by step tutorial on the Heartfelt Creations Blog -

 Have you started making your Christmas projects yet? If you are still looking for some inspiration for the festive season we have a tutorial for you to create a stunning wreath with step by step instructions. This is a perfect gift for those special friends or the perfect decoration that your loved ones will treasure for a long time to come.


Heartfelt Creations Products


HCPC3680 Sparkling Poinsettia Stamp
HCD1766 Sparkling Poinsettia Die
HCPC3679 Large Sparkling Poinsettia Stamp
HCD1765 Large Sparkling Poinsettia Die
HCPC3791 Festive Holly & Cardinal Stamp
HCD17145 Festive Holly & Cardinal Die
HCPC3833 Silent Night Scroll Stamp
HCD17186 Silent Night Scroll Die
HCPC3775 Flowering Dogwood & Dove Stamp
HCD17131 Flowering Dogwood & Dove Die
HCS14591 Assorted Bead Stamens Small
HCST1401 Deluxe Flower Shaping Tool Kit
HCFB1464 3D Floral Basics Mold
159723 Designer Dries Clear Adhesive
HCDA1449 Stack and Store Daubers
Brilliance Pearlescent Poppy Ink
Archival Jet-Black Ink

Other Products

White Cardstock for stamping
Inca Gold Lava Red
Versafine Smokey Grey Ink
Distress Peeled Paint Ink
Distress Antique Linen Ink
Distress Walnut Stain Ink
Copic Marker R27
Diamond Stickles
Glossy Accents
Fibre Ribbon
Sheer Ribbon
Solid Ribbon
Decorative Brad

Wreath


Step 1-Tie a fibre ribbon around your wreath


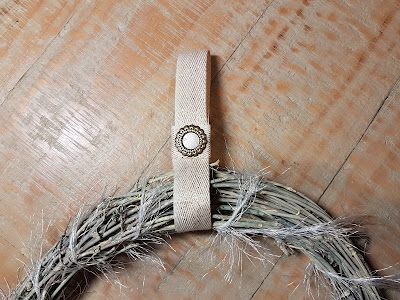
Step 2-Tie a ribbon around the top of your wreath to create a hanger. Attach a decorative brad to the front to conceal the join


Step 3-Using your Sparkling Poinsettia Stamp and Die and your Large Sparkling Poinsettia Stamp and Die, stamp your flowers and leaves using Archival Jet-Black Ink and cut with coordinating dies.


Step 4-In the following steps you will be coloring and shaping your poinsettias and holly leaves.


Step 5-Color the edges of your flowers with Brilliance Pearlescent Poppy and then completely color your flowers in Inca Gold Lava Red. Tip – you can water down your Inca Gold if needed. Shape your flowers using your Deluxe Flower Shaping Tool kit or your 3D Floral Basics Mold. Adhere 2 large and 1 small poinsettia together for your large flowers and 2 small together for your small flowers. You will need 3 Large complete flowers and 4 small complete flowers.


Step 6-Using your paper piercer from the Deluxe Flower Shaping Tool Kit, pierce a hole in the centre of your flowers.


Step 7-Thread your stamens through the centre of your flower and put a little Designer Dries Adhesive at the base and thread the stamens and hold in place still it starts to dry.


Step 8-Your completed flower. Do the same with the remainder of your flowers large and small.


Step 9-You will have 3 large and 4 small completed flowers.


Step 10-Color your holly leaves using Distress Peeled Paint ink, and then highlight heavier on the edges of your leaves


Step11-Using your Festive Holly & Cardinals stamp, stamp a variety of small and large holly sprays using Archival Jet-Black ink. Cut with coordinating dies.


Step 12-Color your large leaves sprays using Distress Peeled Paint ink and your berries using a copic marker R27.


Step 13-Color your small leaves sprays using Distress Peeled Paint ink and your berries using a copic marker R27.


Step 14-Stamp your O’Holy Night Scroll using Versafine Smokey Grey ink and ink with Distress Antique Linen and then highlight with Distress Walnut Stain. Cut with coordinating die. Stamp your Flowering Dogwood & Dove with Archival Jet-Black Ink and cut with coordinating die. Very lightly ink the edges of your dove with Distress Antique Linen.


Step 15- Using your solid and sheer ribbon tie a bow in each. Now you have all your elements done your can start to assemble your wreath.

Step 16-Using a hot glue gun adhere your holly leaves to your poinsettias. You will need 3 large and 4 small complete flowers with holly leaves attached to the bottom.


Step 17-Using a hot glue gun lay down your sheer bow first then adhere a holly leaf to the left and the right and then adhere the solid bow over the top.

Step 18- Using a hot glue gun adhere 1 small Holly spray facing up and then adhere 1 small holly spray facing down.


Step 19- Using a hot glue gun adhere a small flower in the centre.


Step 20- Lay out your holly sprays and when happy with placement adhere in place using a hot glue gun.


Step 21-Start with the position you wish your bow to be. Using a hot glue gun adhere 1 large flower above and below where your bow will be.


Step 22-Using a hot glue gun adhere your bow in place.


Step 23-Above the bow your will have 1 large flower and 1 small


Step 24- Below the bow you will have 1 large then 1 small then 1 large leave a little gap for your dove then 1 small.


Step 25-Using a hot glue gun adhere your scroll to the back of the poinsettias and bow, just pick a few places to glue the scroll in place. Decorate with Diamond Stickles.


Step 26-Using a hot glue gun adhere your dove in place. Decorate with Diamond Stickles.


Step 27-Adhere any extra holly sprays or leaves to fill any gaps. Decorate your scroll with Diamond Stickles. Decorate your holly leaves using Diamond Stickles. Apply Glossy Accents to your berries.


I hope you enjoyed my tutorial.

Happy Crafting

Tracy C x x


Merry & Bright Winter Scene

New on the Heartfelt Creations Blog today, my Winter Scene Foldout card. Head over to Heartfelt to take a look at the New Merry and Bright Collection.


Heartfelt Creations products

HCPC-3836 Merry Little Christmas Cling Stamp Set
HCPC-3837 Snowy Pine Village Cling Stamp Set

HCD1-7195 Snowy Pine Village Die
HCPC-3838 Merry and Bright Accents Cling Stamp Set
HCD17196 Merry and Bright Accents Die

HCD1-7191 Intricate Swirls Die
HCD1-7119 Classic Border Basics Die
HCD2-151 Cut Mat Create 2A
HCPC-3748 Gift Wrapped Present Cling Stamp Set
HCCF1-443-2 41/4 x 5 1/2 Foldout Cards White
RACP_468 Archival Ink Jet-Black
159723 Designer Dries Clear Adhesive
159951 Designer Dries White Adhesive


Other products used
White card for stamping and die cutting, sheer ribbon, Ultrafine Glitter, Stickles Diamond, Couture Creations Grunge Embossing Folder CO723936.


https://www.heartfeltcreations.us/video/136/quick-tips-and-techniques-with-border-essential-dies-to-create-stunning-cards
https://www.heartfeltcreations.us/video/151/creating-quick-cards-with-decorative-dies-and-foldout-cards


Instructions

Using your Couture Creations Grunge embossing folder, emboss each section of your card. Cut 4 scalloped borders from your Classic Border Basics Die set using white cardstock. You will have to trim down 2 borders to make one border to fit one of the sections of your card. Adhere to the back of each section.

You will be using your Versafine Smokey Grey Ink to do all your stamping on white cardstock. Using your Snowy Pine Village Stamp Set, stamp your pine trees 4 times. Stamp your Pine Village once and cut with coordinating dies. Using your Merry Little Christmas Cling stamp set, stamp your front sentiment and cut out with the rectangle die from the Cut Mat Create 2A set. Cut 1 decorative mat using  your Intricate Swirls Die Set. Using 3d adhesive, adhere your sentiment over your intricate swirls mat. Stamp your inner sentiment on white cardstock using your Gift-Wrapped Presents Stamp Set and trim down to size. Stamp 2 holly leaves and 2 poinsettias using your Merry and Bright Accents Cling Stamp Set and die cut with coordinating dies.


Assemble your card - starting on the third section of your foldout card, using 3d adhesive adhere your snowy pine village, this is where you will line up all the elements you are going to use. I like to lay my elements down to line up before I adhere in place. Trim the selected trees from you pine tree images, adhere 1 either side of your snowy pine village. Using 3 adhesive adhere your sentiment below. Adhere your shaped holly leaves and a single poinsettia to each side of your sentiment. Using Designer Dries White adhesive to create a snowy scene and then apply ultrafine glitter over the top. Apply some glue and glitter over your trees and poinsettia and holly as well. Allow to dry before your do your next section.


Alternately this would also make a beautiful card front 

Back section - line up your trees in the desired place at the top of the back section of your card, close the other section and check that they line up nicely before adhering in place, when happy adhere with just glue at the bases of each tree. Using Designer Dries White adhesive to create a snowy scene at the bottom of the trees and then apply ultrafine glitter over the top. Allow to dry before your do your next section.


Second section - Using 2 large, 2 medium and 2 small trees, line up your trees with your card closed, when happy adhere in place with glue at the bottom of the trees. Using Designer Dries White adhesive to create a snowy scene and then apply ultrafine glitter over the top. Allow to dry before your do your next section.


Front sections - using 3d adhesive adhere your sentiment in place. Tie a bow out of your sheer ribbon, this is going to be adhered on the second section so when your card is closed it sits nicely behind your sentiment from the front section,  glue it in place. Using Designer Dries White adhesive to create a snowy scene along the bottom edge and then apply ultrafine glitter over the top. Allow to dry. Decorate with stickles as desired.


Happy Crafting
Tracy C x x 

15.8.18

Merry & Bright Joy Banner

New on the Heartfelt Creations Blog today. This is my Joy Banner created with the New Merry & Bright Collection. Head over to Heartfelt to take a look at the Merry & Bright Collection.


Heartfelt Creations Products

HCD17162 Eyelet Hearts Die
HCD17146 Festive Holiday Die
HCDP1293 Merry & Bright Paper Pad
HCPC3838 Merry & Bright Accents Cling Stamp set
HCPC3837 Snowy Pine Village Cling Stamp set
HCD17195 Merry & Bright Accents Die
HCD17196 Snowy Pine Village Die
HCPC3822 Poinsettia & Holly Cluster Cling Stamp set
HCD17176 Poinsettia & Holly Cluster Die
HCFB1463 3d Poinsettia Shaping Mold
159723 Designer Dries Clear Adhesive
TSMP602 Memento Teal Zeal
TSMP501 Memento Lilac Posies
ANC806 Silver Lining Prills

Other Products Used

Distress Antique Linen, Walnut Stain, Peeled Paint
Versafine Smokey Grey
White card for stamping and die cutting
Sheer ribbon
Light blue eyelets, croppadile for setting eyelets
3d Adhesive


https://www.heartfeltcreations.us/video/167/quick-and-easy-flowers-using-shaping-molds

Instructions

Using your Merry & Bright Paper Collection, select the cardstock you wish to use for the background, I have used a light blue, cut 3 of the eyelet hearts using the largest eyelet hearts from your Eyelet Hearts Die set. Using 1 size smaller cut 3 white hearts (you will be using this to adhere to the back of your banner). Using white cardstock cut 3 Festive Holiday die cuts. Adhere this to the top of the heart as pictured using Designer Dries Clear adhesive. using a croppadile set a eyelet in the left and right corners of your heart, making sure to keep in a straight line.


Using the JOY cardstock fussy cut around each letter as pictured.


Using your Poinsettia & Holly Clusters stamp, stamp the small poinsettia using Memento Lilac Posies and then again stamp another set using the Memento Teal Zeal, cut with coordinating die. Stamp your holly leaves using Distress Peeled Paint and cut with coordinating die. Once die cut lightly highlight the edges of your die cuts with the same color as they were stamped with. Spray with a mini mister and shape in your 3D Poinsettia shaping mold. When shaped push in the center with your Deluxe Shaping Tool and glue 2 of each flowers together along with a holly underneath. You will require 4 pink and 2 blue complete flowers.


Using your pinecone leaf spray stamp from the Snowy Pine Village Stamp set, stamp 3 sprays using your Versafine Smokey Grey ink, cut out with coordinating die and then color with Distress Peeled Paint ink. Stamp 6 single leaf sprays using your Merry & Bright Accents stamp set using Versafine Smokey Grey ink and cut with coordinating die and then color with Distress Peeled Paint ink. Using your pinecone stamp from your Merry & Bright Accents Stamp set, stamp 3 sets of pinecones using your Distress Walnut Stain Ink, color with antique Linen and cut with coordinating die. Lightly highlight with Walnut stain.
J panel, adhere your spray at the top and using 3d adhesive adhere your J.  Under the left top of the J slide in a single leaf spray. Adhere 1 pinecone to the top and then adhere 1 pink and 1 blue flower.

O panel, adhere your spray at the top and using 3d adhesive adhere your O, under the right top of the O slide in a single pinecone. On the top of the O in the right corner adhere 1 pink flower and then adhere 1 single leaf to the left and 1 to the right. In the bottom left corner adhere 1 pink flower.

Y panel, adhere your spray at the top and using 3d adhesive adhere your Y. under the left bottom of the Y slide in a single leaf spray. Adhere 1 pinecone to the bottom left. Adhere 1 single leaf under your pinecone and adhere in the bottom right side. Adhere 1 pink flower to the top right and 1 blue flower to the bottom left.

Apply prills to the flower centers. Once dried, apply glossy accents to the berries, bird and the ornaments. Apply stickles as desired.

Thread a ribbon through your banner pieces, when you have in the correct place adhere a heart to the back of each banner piece to keep your ribbon adhered in place. You can use this to stamp your name or write your sentiment.


Happy Crafting
Tracy C x x

8.8.18

Merry & Bright Snowglobe Card

New on the Heartfelt Creations Blog today. The new Merry & Bright Collection. To see the whole collection head over to Heartfelt Creations - Merry and Bright Collection


Heartfelt Creations Products

HCD1-7194 Merry Little Christmas Die
HCD1-7195 Snowy Pine Village Die
HCD1-7196 Merry and Bright Accents Die
HCPC-3838 Merry and Bright Accents Stamp
HCDP1-293 Merry and Bright Paper Collection
HCD2-7190 Frame a card Leafy Border Die
HCD1-7176 Poinsettia & Holly Clusters Die
HCPC-3822 Poinsettia & Holly Clusters Stamp Set
HCFB1-463 3D Poinsettia Shaping Mold
HCST401 Deluxe Flower Shaping Tool Kit
159723 Designer Dries Clear Adhesive
HCDA1449 Stack and Store Daubers
TSMP602 Memento Teal Zeal
TSMP501 Memento Lilac Posies

ANC806 Silver Lining Prills

Other Products UsedDistress Ink Peeled Paint
Stickles Diamond
3d Adhesive
Pink Ribbon
Fibre Ribbon
White Cardstock
Shaker Card insert


Video Links for Shaping with 3D Molds -
https://www.heartfeltcreations.us/video/167/quick-and-easy-flowers-using-shaping-molds


Instructions

Using your poinsettias and Holly Clusters stamp, stamp a mixture of large poinsettias in Lilac Posies and small poinsettias in Teal Zeal. Stamp a mixture of holly leaves using Distress Peeled Paint ink. Die cut with coordinating dies and highlight the edges of your elements using the same color inks. Shape in your 3D Poinsettia Shaping Mold. You will need 6 small teal and 4 large lilac posies and a holly leaf to match each set. You will use 2 flowers for each. You will finish with 2 large pink and 3 small teal.


Stamp your Holly leaves using your Merry and Bright accents stamp using Distress Peeled Paint ink, color with same ink and die cut with coordinating die, highlight heavier on the edges.


Using white cardstock cut 1 leafy border, this will become the base of your snowglobe.

Using your desired mat from your Merry and Bright Paper Collection, highlight the winter scene using Diamond Stickles. Choose another mat that has a circle on in and cut out with the largest Circle from your Circle Basics Large Set (or choose the size that fits your shaker card insert).

Using your Merry Little Christmas and Snowy Pine Village die set, cut 1 leaf spray and 2 baubles branches from your Merry and Bright Paper Collection. The baubles you will need 1 of each size. 
Select the sentiment from your paper collection.

Cut your cardbase out of white cardstock 6" x 12". Fold in half and run a bone folder along the edge for a clean line.

Tie a bow out of your pink ribbon. Now you have all your elements done you can assemble your card.

Put the desired amount of Stardust in the centre of your picture mat, making sure it is nowhere near where you are going to glue. Use your designer dries clear adhesive and apply a good amount of glue around your shaker card insert. Hold over you picture in the desired area and hold firmly until dried, push the glue around to make sure your globe in sealed, you do not want any gaps for your glitter to escape.

Using 3 adhesive adhere your aperture mat over the top. Adhere your leafy border at the bottom of your globe. Adhere your shaped flowers 1 small teal, 1 large pink, 1 small teal, 1 large pink, 1 small teal. Cut your leaf spray into single and adhere in between the flowers. Adhere 2 of your holly leaves under the middle flower. Adhere your bauble branches to the top of the globe, 1 facing left and 1 facing right. Adhere your pink bow and adhere a little fibre ribbon to each side and adhere your sentiment over the centre of your bow section. Adhere your prills to your flower centres. Decorate with Stickles as desired.


Happy Crafting
Tracy C x x