Have you
started making your Christmas projects yet? If you are still looking for some
inspiration for the festive season we have a tutorial for you to create a
stunning wreath with step by step instructions. This is a perfect gift for
those special friends or the perfect decoration that your loved ones will
treasure for a long time to come.
Heartfelt
Creations Products
HCPC3680 Sparkling Poinsettia Stamp
HCD1766 Sparkling Poinsettia Die
HCPC3679 Large Sparkling Poinsettia Stamp
HCD1765 Large Sparkling Poinsettia Die
HCPC3791 Festive Holly & Cardinal Stamp
HCD17145 Festive Holly & Cardinal Die
HCPC3833 Silent Night Scroll Stamp
HCD17186 Silent Night Scroll Die
HCPC3775 Flowering Dogwood & Dove Stamp
HCD17131 Flowering Dogwood & Dove Die
HCS14591 Assorted Bead Stamens Small
HCST1401 Deluxe Flower Shaping Tool Kit
HCFB1464 3D Floral Basics Mold
159723 Designer Dries Clear Adhesive
HCDA1449 Stack and Store Daubers
Brilliance Pearlescent Poppy Ink
Archival Jet-Black Ink
Other Products
White Cardstock for stamping
Inca Gold Lava Red
Versafine Smokey Grey Ink
Distress Peeled Paint Ink
Distress Antique Linen Ink
Distress Walnut Stain Ink
Copic Marker R27
Diamond Stickles
Glossy Accents
Fibre Ribbon
Sheer Ribbon
Solid Ribbon
Decorative Brad
Wreath
White Cardstock for stamping
Inca Gold Lava Red
Versafine Smokey Grey Ink
Distress Peeled Paint Ink
Distress Antique Linen Ink
Distress Walnut Stain Ink
Copic Marker R27
Diamond Stickles
Glossy Accents
Fibre Ribbon
Sheer Ribbon
Solid Ribbon
Decorative Brad
Wreath
Step 1-Tie a fibre ribbon around your wreath
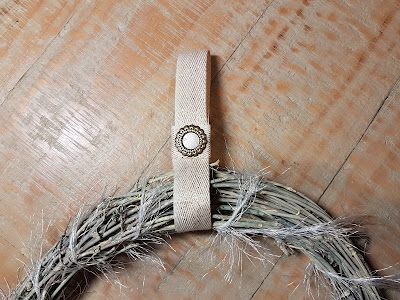
Step 2-Tie a ribbon around the top of your wreath to create
a hanger. Attach a decorative brad to the front to conceal the join
Step 3-Using your Sparkling Poinsettia Stamp and Die and
your Large Sparkling Poinsettia Stamp and Die, stamp your flowers and leaves
using Archival Jet-Black Ink and cut with coordinating dies.
Step 4-In the following steps you will be coloring and
shaping your poinsettias and holly leaves.
Step 6-Using your paper piercer from the Deluxe Flower
Shaping Tool Kit, pierce a hole in the centre of your flowers.
Step 7-Thread your stamens through the centre of your flower
and put a little Designer Dries Adhesive at the base and thread the stamens and
hold in place still it starts to dry.
Step 8-Your completed flower. Do the same with the remainder
of your flowers large and small.
Step 9-You will have 3 large and 4 small completed flowers.
Step 10-Color your holly leaves using Distress Peeled Paint
ink, and then highlight heavier on the edges of your leaves
Step11-Using your Festive Holly & Cardinals stamp, stamp
a variety of small and large holly sprays using Archival Jet-Black ink. Cut
with coordinating dies.
Step 13-Color your small leaves sprays using Distress Peeled Paint ink and your berries using a copic marker R27.
Step 14-Stamp your O’Holy Night Scroll using Versafine
Smokey Grey ink and ink with Distress Antique Linen and then highlight with
Distress Walnut Stain. Cut with coordinating die. Stamp your Flowering Dogwood &
Dove with Archival Jet-Black Ink and cut with coordinating die. Very lightly
ink the edges of your dove with Distress Antique Linen.
Step 15- Using your solid and sheer ribbon tie a bow in
each. Now you have all your elements done your can start to assemble your
wreath.
Step 16-Using a hot glue gun adhere your holly leaves to
your poinsettias. You will need 3 large and 4 small complete flowers with holly
leaves attached to the bottom.
Step 17-Using a hot glue gun lay down your sheer bow first
then adhere a holly leaf to the left and the right and then adhere the solid
bow over the top.
Step 18- Using a hot glue gun adhere 1 small Holly spray
facing up and then adhere 1 small holly spray facing down.
Step 22-Using a hot glue gun adhere your bow in place.
Step 23-Above the bow your will have 1 large flower and 1
small
Step 24- Below the bow you will have 1 large then 1 small
then 1 large leave a little gap for your dove then 1 small.
I hope you enjoyed my tutorial.
Happy Crafting
Tracy C x x


No comments:
Post a Comment