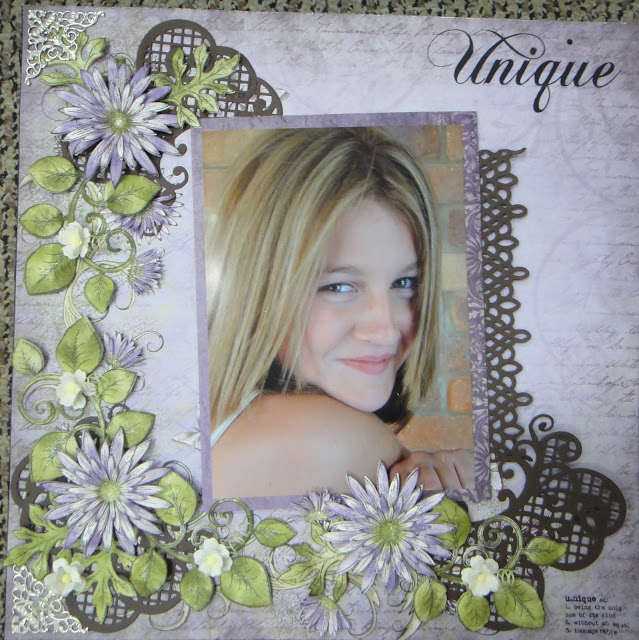
Materials
Delicate Asters Paper Pad HCDP1226 DISCONTINUED
Brown Bazzill
Natural Bazzill
Kaisercraft Rubons Unique RB116
Kaisercraft Rubons Beauty Rb126
Delicate Asters Die HCD726 DISCONTINUED
Delicate Asters Pre Cut Set HCPC3494DISCONTINUED
Decorative Flowerpot Die HCD732 DISCONTINUED
Beautiful You Pre Cut Set HCPC3532 DISCONTINUED
Timeless Armour Die HCD728 DISCONTINUED
Decorative Lattice Swirl Die HCD733 DISCONTINUED
Lattice Border Die HCD713 DISCONTINUED
Silver Metal Flourish Corners – Wild Orchid Crafts
White Mini Blossoms – Wild Orchid Crafts
Distress Ink Dusty Concord (flowers)
Distress Ink Peeled Paint (leaves)
Clear Wink of Stella
Instructions
1. Using
your Delicate Asters Paper Pad, choose the background paper you wish to use. I
have used the second and third image in the pad for the background paper and
the seventh image for the photo mats. These papers do not have an individual
codes and cannot be purchased separately.
2. Adhere
your metal flourishes to top and bottom of your left page and to the top and
bottom of your right page.
3. Apply
your rubons, use the picture above as a guide. Unique will go in the top right
corner of the first layout and in the bottom right corner will be the
dictionary quote. On the second layout beauty will go in the bottom right side
remember to leave room for the silver metal flourish.
4. Cut
3 mats using the darker purple paper, I have cut the paper so the swirl image
is on the right hand side of my larger photo, and 1 on the left and 1 on the
right for my smaller photos, use the picture above as a guide. Cut the larger
mat 19cm x 14 cm (this will fit a 5” x 7” photo) adhere your photo. Cut 1 lace
strip from your brown cardstock using your Lace Border Die. Adhere to the right
hand under side of the larger photo mat. Cut 2 smaller mats 11cm x 16cm (this
will fit a 4”x6” photo), adhere your photo. Cut 2 Decorative top swirls from
your brown cardstock using the Timeless Amour Die Set. Adhere to the back top of
your 2 smaller photo mats. Using 3d
adhesive adhere your mats to your layout, use picture above as guide.
5. Cut
3 Swirls from your brown cardstock using the Decorative Lattice Swirl Die and
Adhere to your layout as pictured.
6. Cut
2 lattice hearts from your brown cardstock using the Timeless Amour Die Set.
Cut 1 inner heart
using your natural cardstock using the same Die Set. You will get an outer lace
heart and an inner plain heart when cutting with this die. Using the inner
heart die apply your Beauty dictionary description as pictured above. Adhere
your first brown lattice heart over the top of the natural heart using glue and
on the second heart adhere using a 3d foam,
only in the top centre and bottom centre so you can fold your heart up
for added effect. Put aside until you cut your flowers and leaves.
7. Using
the Heartfelt Creations Delicate Aster Pre cut stamp set, stamp 4 of the
largest flowers, 6 of the second size flowers, 6 of the third size flower and 6
of the smallest size flower. These flowers are for your full flowers, you will
also need to stamp 10 of the smallest flowers, these ones you will use to make
the buds. Using a die cutting machine, cut the stamped images with the matching
Delicate Asters Flower Dies.
8. Using
the leaf stamp in your Delicate Asters Set, stamp 9 leaves. Cut the stamped
images with the matching Delicate Asters Leaf Die.
9. Using
the Heartfelt Creations Beautiful You Stamp Set, stamp 5 of the leaf swirls. Cut
the stamped images with the matching Flower Pot Die Set -Swirl Leaf Die.
10.Apply
the dusty concord inks using a sponge dauber to your flowers, and using the
peeled paint ink apply to the leaves.
11.Using
a shaping tool and mat, shape your flowers and leaves. When making buds, just
fold the flower in half. Adhere your flowers together using a good glue. I like Art Glitter Glue, it also can be
purchased with a fine tip, which makes adhering flowers together much easier.
12.Layer
4 large flowers with all sizes of the asters to create 4 flowers with 4 in
each, biggest to smallest (total needed 16 flowers). Layer 2 of the second size
flowers down to the smallest flower to create 2 flowers with 3 in each (total 6
flowers) you will be left with 10 small flowers which you will fold in half to
create the buds.
13.When
all your elements are stamped, cut and coloured, lay them on your layout according
to the picture or as desired. Adhere your elements down. I used the Art Glitter Glue to adhere down
the remainder of my elements. With your white mini flowers, I use them to fill
the empty spaces. I curl my wire stems
for added effect.
14.I
love adding glitter to my projects. In this project I have use a wink of stella
clear pen, this is great for adding that beautiful luster to flowers. I also
like using glitter dust spray when you need more shimmer.
Technique Step by Step
1. Link
for pdf for matching the stamps dies
http://www.heartfeltcreations.us/howto?view=prodinstruct
2. Link
for shaping with the delicate asters die
3.
The Fool Proof Way to Line up Your Stamps & Dies
I was
published in Australian Scrapbook Ideas Issue #30


No comments:
Post a Comment